Help:VisualEditor/User guide: Difference between revisions

From The Sims Wiki, a collaborative database for The Sims series
Jump to navigation Jump to search
Content added Content deleted
(begin the process of copying this page over from mw:Help:VisualEditor/User_guide/en)
(No difference)

Revision as of 17:08, 25 August 2019

If you would like to try the visual editor without editing an article, here is a page where you can freely test it. You don't need an account to use the visual editor on that page.


Opening the visual editor

To edit a page using the visual editor, press on the "Edit" tab at the top of the page.

It may take a few seconds for the page to open for editing, and longer if the page is very long.

Pressing on the "Edit source" tab will open the classic wikitext source editor.


You can also open the visual editor by pressing on the "edit" link on each section.

Getting started: the visual editor's toolbar

Screenshot of the visual editor's toolbar
The visual editor's toolbar appears at the top of the screen when you begin editing. It includes some familiar icons:

Undo and Redo the changes you have made.

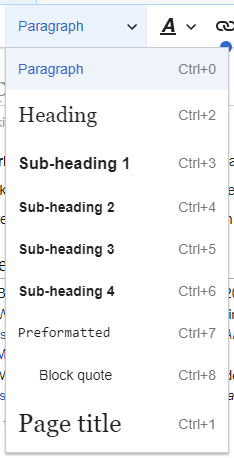
Headings pull-down menu: allows you to change how the paragraph is formatted. To change the style of a paragraph, put your cursor in the paragraph and select an item in this menu (you don't have to highlight any text). Section titles are formatted "Heading", and subsections are "Sub-heading 1", "Sub-heading 2", and so on. The normal format for text is "Paragraph".

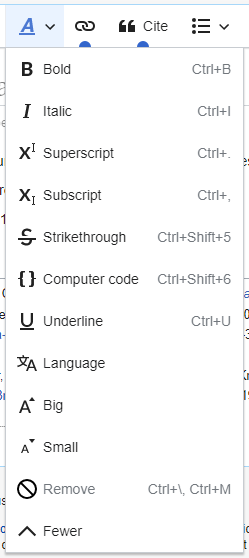
Formatting: Pressing the "A" opens a menu.

  • The "Bold" item (B) bolds the selected text.
  • The "Italic" item (I) italicizes the selected text.
  • The "Superscript" item (x2) causes the selected text to appear smaller than surrounding text and to be slightly higher than the surrounding text.
  • The "Subscript" item (x2) causes the selected text to appear smaller than surrounding text and to be slightly lower than the surrounding text.
  • The "Strikethrough" item (S) adds a solid bar through the selected text.
  • The "Computer code" item (a set of curly brackets: {}) changes the font of the selected text to a monospaced font, which sets it apart from surrounding (proportionally spaced) text.
  • The "Underline" item (U) adds a solid line beneath the selected text.
  • The "Language" item (文A) allows you to label the language (for example, Japanese) and direction (for example, right-to-left) of the selected text.
  • The final item (), called "Remove", removes all character formatting from the selected text, including links.

If you have not selected any text, then when you press the "A" to open the menu, and then select an item, that formatting will apply to the text that you start typing, from wherever your cursor is located.


Linking tool: The chain icon is the linking tool. Pressing on it (usually after selecting some text) opens the link dialog.

Cite menu: The "Cite" menu is used to add inline citations (also called "footnotes" or "references"). All projects have access to basic reference formatting and the ability to reuse citations by using this menu. It also gives users quick access to local citation templates, if these are enabled on their wiki.

(Instructions for adding local citation templates to the Cite menu at a specific wiki are available at mw:VisualEditor/Citation tool.)


⧼citoid-citefromidtool-title⧽ button: If the citoid service is enabled on your wiki, then you will see a ⧼citoid-citefromidtool-title⧽ button instead of a Cite menu.

The citoid service tries to fill out citation templates automatically.


Lists and indentation: The first two items allow you to format text as either a "Bullet list" or a "Numbered list". The last two items allow you to decrease or increase the indentation level of list items.

Insert: The "Insert" menu may be different on some projects. Below is a list of all options that may appear.
  • The "Images and media" icon (a picture of mountains) opens the media dialog.
  • The "Template" icon (a puzzle piece) allows you to edit templates.
  • The "Table" item allows you to insert a table.
  • The "Comment" item (a speech balloon) allows you to insert comments that are not visible to readers; these comments can be seen only when in edit mode, where they are indicated by an exclamation mark icon. In edit mode, pressing on the exclamation mark icon allows you to edit or delete the comment.
  • The "Hieroglyphs" icon (an ankh symbol - ☥) allows you to enter the hieroglyphics inserter. (See below.)
  • The "Code block" item allows you to insert code.
  • The "Musical notation" item allows you to insert a musical notation.
  • The "Gallery" icon (a set of photos) allows you to insert a gallery to the page.
  • The "Math formula" icon (Σ) opens the formula inserter dialog.
  • The "Graph" item allows you to insert a graph.
  • The "Your signature" item allows you to insert a signature that you use on the project. It will be greyed out (not selectable) when you are editing a type of page (a "namespace"), such as an article, where signatures should not be inserted.
  • The "References list" icon (three books) opens a dialog in which you can specify where references will be displayed to the reader. Usually this needs to be done only once on a page.

Special character insertion: The "Special character" (Ω) icon is next to the "Insert" menu. When pressed, it displays a dialog showing many special characters. By pressing on a specific character, you place it into the text. These special characters include some standard symbols, diacritics, and mathematical symbols. (This list may be customized locally. See mw:VisualEditor/Special characters for instructions.)

The Edit notices button displays any notices for the page.

The Page options menu is to the left of the Publish changes button and the Switch editor menu. On this menu there is a button to open an Options dialog with the following (left side) tabs:
  • Categories allows you to add categories to this page and to adjust how the page is sorted, when displayed within a category by setting a different index to sort with.
  • Page settings allows you to make the page a redirect and adjust options of this redirect, to adjust settings regarding the displaying of the Table of Contents, to disable the edit links next to each heading, and to define the page as a disambiguation page.
  • Advanced settings allows you to adjust the settings regarding indexation of the page by search engines, showing a tab to add a new section, and the displayed title.
  • Languages which shows a list of pages in other languages that are linked to that page.
  • Templates used shows a list of links to each template used on this page.

The tabs of the Options dialog are also displayed in the Page options menu and can be opened by clicking on it. Furthermore the Page options menu contains the button View as right-to-left and the button Find and replace which opens a dialog where you can insert characters, terms or Regular expressions you are searching for and those to replace them with, together with several buttons for options.


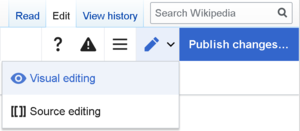
The switch to source editing button is next to the Publish changes button. It allows you to switch to the wikitext editor.